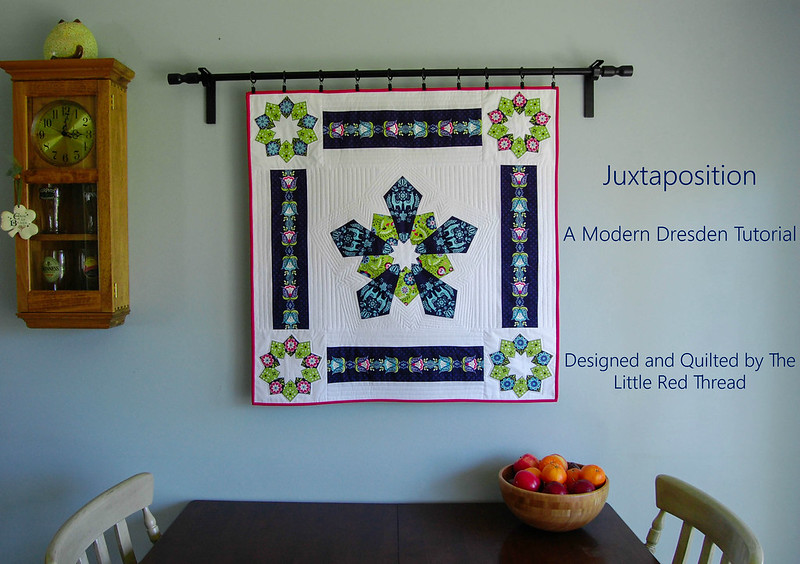
Juxtaposition: A Modern Dresden Tutorial

Juxtaposition Title

Juxtaposition: A Modern Dresden

Designed and Quilted by Rebekah Taylor of The Little Red Thread

Finished Size: 34 x 34

I had the honor of designing another fun project from Betz White’s newest fabric line Juxtaposey for Riley Blake. The color in this line is LUSCIOUSLY saturated.  They range from bold red and gold to fuschia and navy. There is something for everyone’s palatte in these eccletic world-inspired designs.  And guys, there are llamas.

L-L-A-M-A-S

Nevermind that one of my favorite movies is the Emperor’s New Groove or the fact that I have several llama figurines.  I mean who knew llamas were such a popular, lovable animal? So when Betz asked if I wanted in on designing another project for her latest line there was no hesitation.

llama face

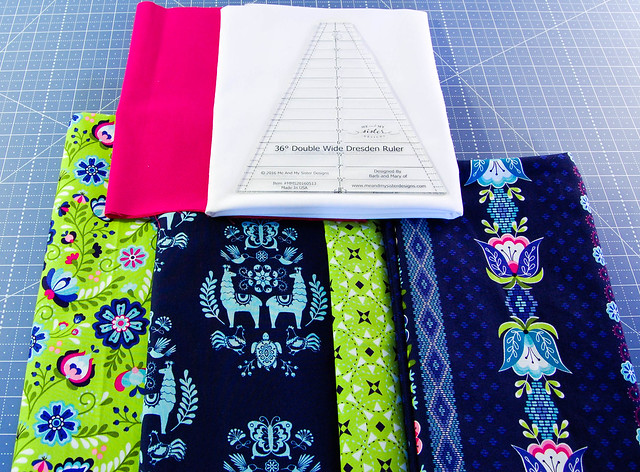
This pattern was designed using the Double Wide Dresden ruler by Me & My Sister Designs.  All fabric requirements are based around the use of this ruler.  The Double Wide ruler allows you to use only 10 fan blades to complete a circle verses a traditional Dresden ruler where you have 20 blades.  Because you are doubling the width of the fan blade these dresdens are not only made faster but are finished at both ends eliminating the need for a center circle.

SUPPLIES
Fabric:

¾ yd Posey Stripe Navy (tulip stripes and small dresden blades flowers)
½ yd Posey Medallion Navy (large dresden blades)
¼ yd Green Posey Main (medium dresden blades)
¼ yd Posey Star Green (small dresden blades)
1 ¼ yds Solid White (background)
1 ¼ yds White (backing)
¼ yd Pink (binding)

Juxtaposition Wall Hanging

Notions:
Double Wide Dresden Ruler by Me & My Sister Designs
Thread
Scissors
Turning tool/chop stick
Iron
Spray starch
Basting supplies

———–

All pieced seams are sewn with 1/4″ seam allowance
All seams are pressed opened to reduce bulk

Blade Cutting
———————

Center Dresden:

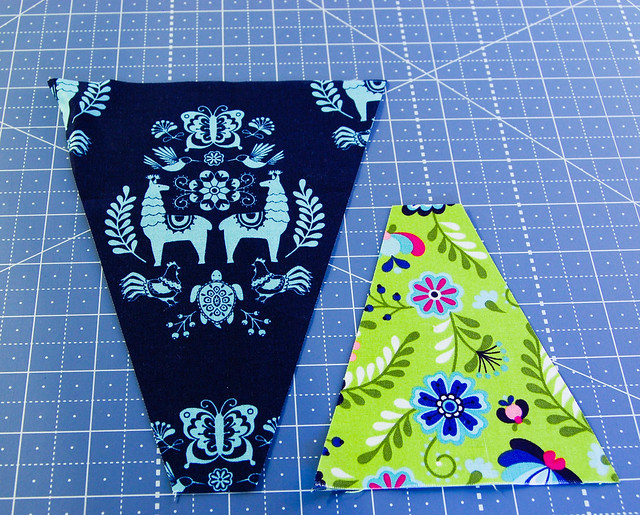
1. Cut an 8” wide strip of the Posey Medallion Navy aka The Llama Medallion.  Line up the 8” line at the bottom of the ruler onto the edge of your fabric, centering a llama medallion as best you can.  Cut 5 large blades.

2. Cut a 5” wide strip of the Green Posey Main. Line up the 5” line at the bottom of the ruler onto the edge of your fabric. Cut 5 medium blades.

Juxtaposition Wall Hanging

Corner Dresdens:

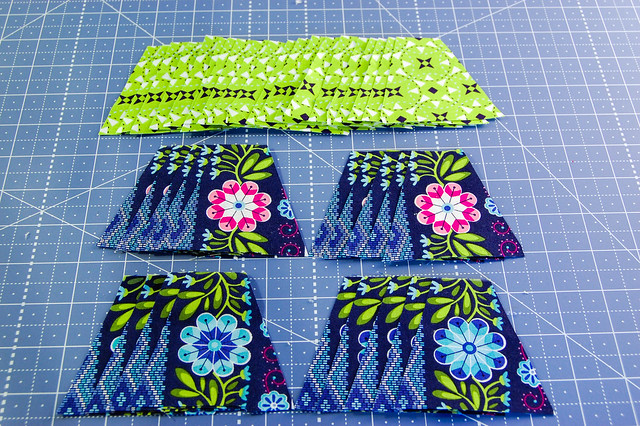
3. Cut a strip of the posey flowers off of the Posey Stripe Navy, then carefully fussy cut the pink and blue flowers using the 3” line on the Double Wide Dresden ruler as a guide. Take your time, this is the hardest part. You may find that you will need to cut another strip to find enough usable flowers. Cut 10 small blue flower and 10 small pink flower blades.

4. Cut a 3” strip of the Posey Star Green then using the 3” line on the ruler cut 20 small blades.

You will have a total of 40 small dresden blades.

Juxtaposition Wall Hanging

Dresden Assembly
——————————

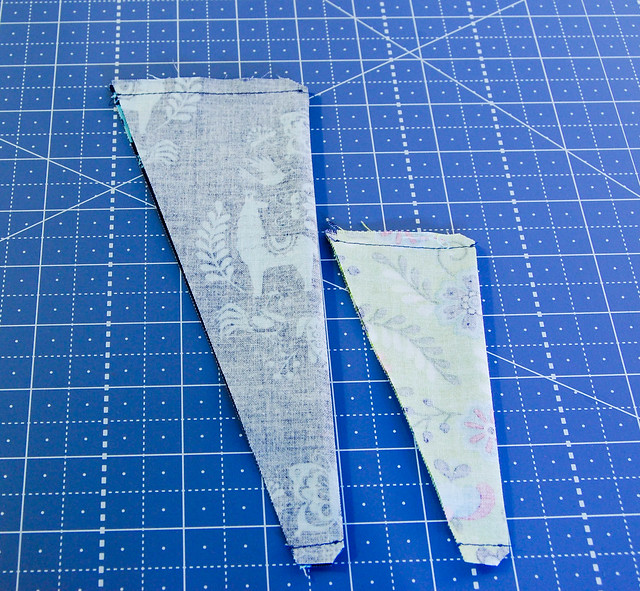
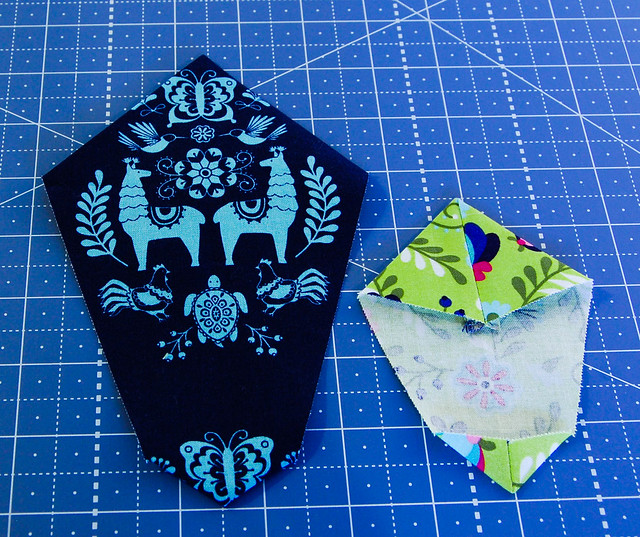
1. Take a fan blade and fold it in half lengthwise. I like to give mine a quick press with my iron to crease the fold line, finger pressing works well too.  Sew ¼” at the top and bottom of the blade. Clip the inside corners just enough to reduce the bulk being careful not to cut through your stitches.

DSC_0093

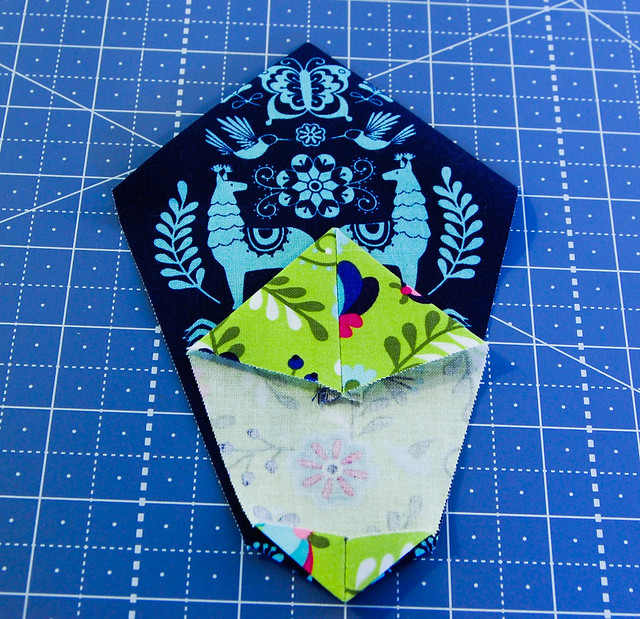
Press open the seams on each end of the blade using your fingers then turn each end right side out. A turning tool or chopstick is especially helpful for poking out the points, be gentle so you don’t push through the ends!

2. Flip your blade so the back is face up and line up the seams you finger pressed open on the center fold line you creased in step 1.  This centers your points. Carefully press them flat with your iron and a bit of steam.

DSC_0094

Continue steps 1-2 until all your blades are done.

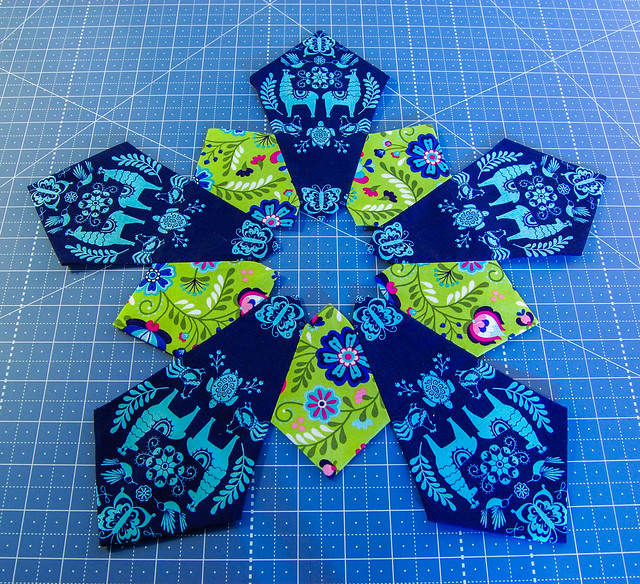
3. When all your blades have been sewn and pressed, arrange 10 blades to form a dresden plate in the pattern you like best.  For example, for the corner dresdens I used the green print then a blue/pink flower and alternated between those for the corner dresdens.

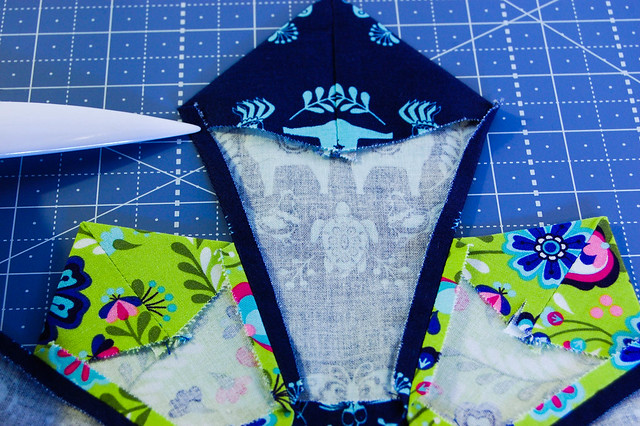
4. Starting with one dresden plate, take two blades place them right sides together and sew  them together starting at the bottom end of your seam.  As the center of this dresden is exposed rather than hidden your eye looks to the center first. Sewing from the bottom up will also keep your center points aligned all the way around.

DSC_0095

*Tip* On the Center Dresden one blade is larger than the other. To keep the exposed sides tucked under on the larger blade go ahead and continue to sew the whole side once you pass the end of the medium blade seam.  When you press your seam open the stitch lines will create a natural exact ¼” for you to press under.

Juxtaposition Wall Hanging

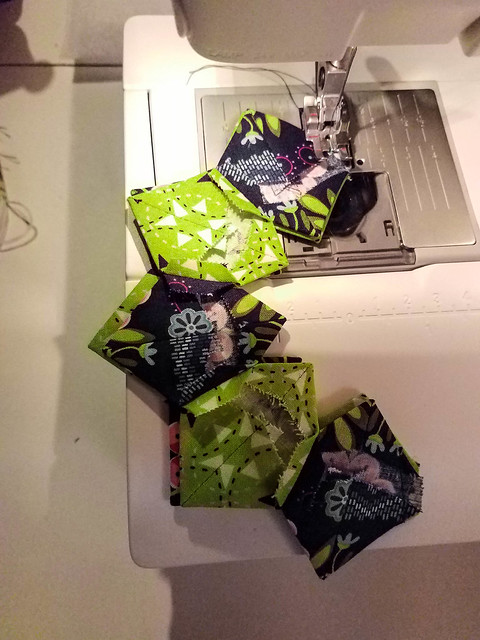
5. Sew and press your blades in groups of 5. For the Center Dresden you will have alternating sizes.

6. Once you have all your blades sewn in groups of 5, take 2 matching blade groups and place them right sides together. Sew from the bottom up, press open and you will have a finished dresden!

Juxtaposition Wall Hanging

Repeat steps 1-5 (3) more times for a total of 4 small corner dresdens and 1 large center dresden.

Juxtaposition Wall Hanging

Attaching the Dresdens
————————————–

1. Cut one large 19” x 19” square and (4) 9” x 9” squares from your white background fabric.

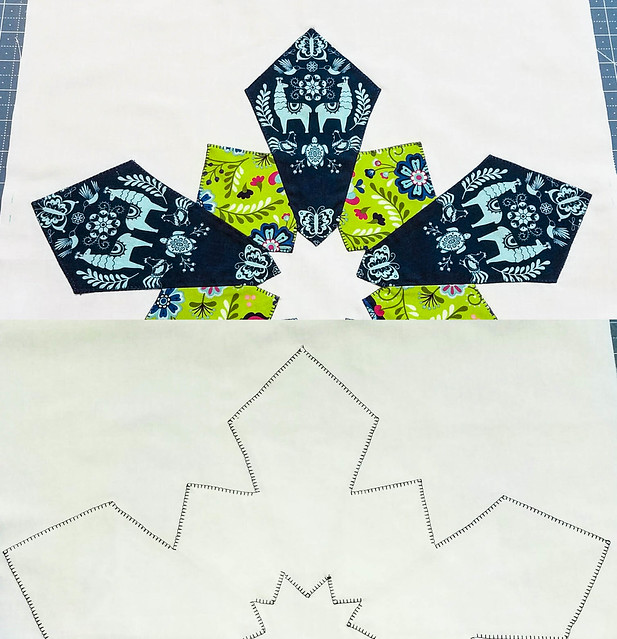
2. Fold your squares into fourths and press the center just enough to make light creases. When you open them up you’ll have your exact center for each block.  Use the center points and crease lines to line up the Center Dresden on the 19” x 19” block. Pin in place being careful not to shift it too much.  Do the same for the (4) Corner Dresdens.

3. Sew on the dresdens to the background using any stitch you’d like. I used a machine blanket stitch.

Juxtaposition Wall Hanging

4. Lightly press your completed dresden block and measure your block again.  It may have shrunk ever so slightly (especially if you used a blanket stitch).

Square down your Center Dresden to 18 ½” square and your (4) Corner Dresdens down to 8 ½” square.  Take your time doing this and always measure twice before cutting.

Set squared blocks aside.

Tulip Border Assembly
———————————–

1. Using the Posey Stripe Navy fussy cut a 4 ½” wide strip of tulips the width of your fabric. Cut 2 long strips. Cut each strip into 18 ½” lengths for a total of (4) 4 ½” x 18 ½” long tulip strips.

2. Using your remaining white background fabric cut (4) 2 ½” x 18 ½” long strips.

3. Sew one white border strip to one tulip border strip, press seam open.  Then sew a second white border strip onto the opposite side of the tulip strip. Press seam open.

Make 4.

Quilt Top Assembly
——————————–

Layout your top using the finished picture as reference.

Start by assembling the Corner Dresden blocks and Tulip borders into horizontal rows.

1. To create one horizontal row take one Corner Dresden keeping your center point pointing up and sew one Tulip Border to the bottom of the Corner Dresden block, press open.  Take a second Corner Dresden, with the center point pointing up and sew that to the bottom of the Tulip Border.

Each Corner Dresden block should have its center points oriented in the same direction.

Make 2 rows like this.

2. To create the middle row take one Tulip border and sew it to the top of the Center Dresden (make sure your Center Dresden’s center point is oriented up), press seam open.  Sew the remaining Tulip border to the bottom of the Center Dresden and press seam open.

3. Sew the Corner Dresden rows to the middle row, press seams open.

Finishing
—————

1. Make your quilt sandwich (quilt top, batting, backing) and baste together using your favorite method.

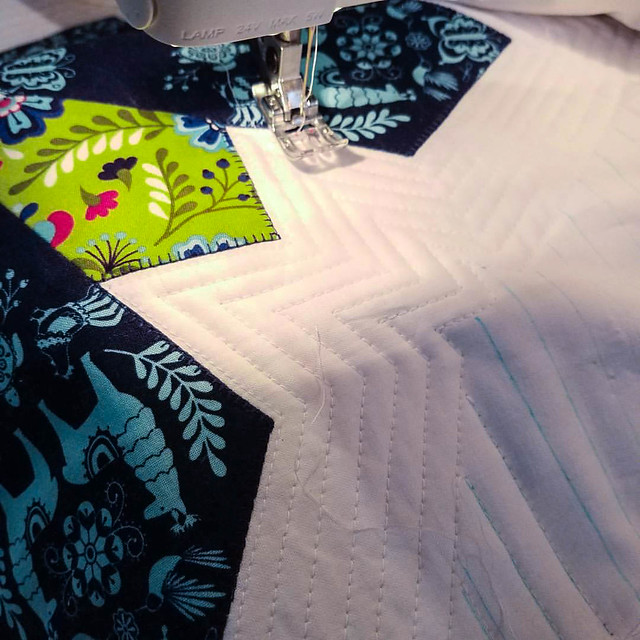
2. Quilt! Quilting doesn’t need to be super fancy to have a wow factor. Sometimes straight lines carry a big punch.

Juxtaposition Wall Hanging

3. Cut 4 strips 2 ¼” wide the width of fabric from your pink fabric for your binding. Attach binding.

Juxtaposition Wall Hanging

Hang your new wall hanging in a favorite spot and enjoy! If you like how the one in the picture is displayed you can purchase the curtain rod and hangers at Ikea.

Juxtaposition Wall Hanging

I hope you loved this new pattern! It was quite a challenge to design but I learned so much from making this and I have found a new love for all things Dresden. Thanks also to Riley Blake and Betz White for providing the amazing fabric used to create this project!

Remember this pattern is free for personal use only, please respect copyright laws.

Happy Sewing!
Juxtaposition

I’ve been busy sewing on multiple projects over the last month, one which is still a little hush-hush and others are simply things I’ve been determined to finish.

Betz White is getting ready to release a new fabric line called Juxtaposey and it is so colorful.  I mean it’s saturated and deep and vibrant and lush….and there are llama, guys.  LLAMAS.  Naturally, I jumped at the chance to get my hands on some and now I’m designing a snazzy “posey” version of a dresden plate using the new Double Wide dresden ruler from Me and My Sister Designs.

It’s coming along so nicely and I can’t wait to share it with you once it’s done in April! It’s just what spring ordered!

20170225_210640

Also, llamas. All the llamas.

In between cutting out tiny little plate pieces I’ve been doing some embroidery because why not?  I seem to suffer from an inability to finish one project before starting another.  Project burn out is real so there’s no harm in switching focus while your brain mulls things over.

20170223_152856

Keep persisting on all those works in progress.

Dutch Cathedrals: A Mini Quilt Tutorial

Dutch Cathedrals Pattern

Betz White’s new fabric line Dutch Treat for Riley Blake is a beautiful and charming homage to Pennsylvania Dutch design.  I was lucky enough to get my hands on some yardage before it shipped at the end of June and immediately delved into some research.  The Pennsylvania Dutch are not, in fact, from the Netherlands, but are made up of several groups of immigrants from both Germany and France.  As I looked further into the history of the region I found my inspiration in a traditional cathedral windows pattern.

Dutch Cathedrals is a summer fresh mini quilt that looks complicated but is wonderfully easy to accomplish.

Finished size: 24″ x 24″

SUPPLIES
Fabric:
1/2 yd Dutch Wreath Gray
1/2 yd Dutch Stripe Gray
1/2 yd Dutch Floral Green (background)
1/2 yd Kona Cotton in Peapod (background)
3/4 yd Kona Cotton in White (cathedral window frames)

1 yd for Backing
3/8 yd for Binding

1 yd of batting

Notions:
thread
scissors
iron
spray starch
basting supplies

Optional:
Basting glue or Elmer’s School glue for holding your window centers in place
——-
All pieced seams are sewn with 1/4″ seam allowance

All seams are pressed opened to reduce bulk
——-

Cutting:
– Fussy cut (9) 4 1/2″ square flower medallions from the Dutch Wreath Gray
– (4) 4 1/2″ squares from the Dutch Stripe Gray
– (16) 4 1/2″ squares from the Dutch Floral Green
– (20) 4 1/2″ squares from the Kona Cotton in Peapod
– (52) 4 1/2″ squares from the Kona Cotton in White
– (3) 2 1/2″ strips for binding

Cathedral Windows Pattern

Block Assembly:

1) Lay out (4) matching squares of either of your green background fabrics.
Dutch Cathedrals Pattern

2) Take (4) of your white squares, press in half and lay one pressed half square on top of one green background square. Make sure that the raw edges of your white half square match up with the raw edges of your background square. Dutch Cathedrals Pattern 2

Dutch Cathedrals Pattern

3) At this point it’s very helpful to do a full layout of your pattern and take a picture of the final layout. Dutch Cathedrals Pattern 4

Dutch Cathedrals Pattern 5 Dutch Cathedrals Pattern 6

Dutch Cathedrals Pattern 7 Dutch Cathedrals Pattern

4) Start assembling a full block. Pull one full block aside along with all of the pressed half squares on top.
Dutch Cathedrals Pattern 9 Stack the pressed half squares on top the opposite side taking care to make sure your raw edges are lined up with the finished pressed edges in the middle. Then place the right side of your green background fabric on top of your pressed half squares, pin to avoid the fabric shifting and sew together.  Press seams open.Dutch Cathedrals Pattern 10

***Hint, always double check that you’re sewing down the correct side!***

5) Open up your sewn units
Dutch Cathedrals Pattern 11

and then place the bottom unit right sides together with the top unit. Your triangle points will meet up. Line up your center seam, pin, sew, press seam open. Dutch Cathedrals Pattern 12

Repeat steps 4 & 5 for the next 8 full blocks.

Finished block should measure 8 1/2″ square

Quilt Top Assembly:

6) Once you have all 9 Full Blocks sewn arrange them according to your layout picture. Note that you are not sewing your window centers in this step. Set the window centers to the side once you double check your layout.
Sew your full blocks together to create 3 rows. Check that your center seams align with each block addition, these will ultimately become your cathedral window frame points. Also double check the layout as you go after sewing each full block, press seams open. Then sew your rows together being careful to match your center seams again and press open.

A helpful way of lining up your centers is to take a pin and place it through the center seam of the top block then match up the center of the block below it, press the pin through that seam and pin in place.
Dutch Cathedrals Pattern 13

7) Cut your batting and backing two inches bigger than your quilt top. Make your quilt sandwich and center your quilt top. Dutch Cathedrals Pattern 14

Baste in place with your preferred method. I used my Kwik Klip tool with my safety pin “grips” by Quilter’s Delight.

***Hint, it may be helpful to put a dot of basting glue/Elmer’s School glue on the back tips of your window centers to hold them place so they don’t shift.***

Don’t be afraid to ask for help.
Dutch Cathedrals Pattern 16

8) Start quilting. Start at the tip of one of your white triangles and pull the edge of your white triangle over the center window block. You’ll notice that it will naturally curve inwards. Pull the curve in and finger press it some then sew about an 1/8th of an inch away from the edge of the cathedral window frame. This will catch the center block, sew the cathedral window frame in place AND quilt the top at the same time! Hooray for multitasking!

***Hint, it may be easier for you to sew the cathedral window frames down if you iron them towards the window centers prior to quilting vs. finger pressing them in as you go or use small dots of your basting glue.***

Dutch Cathedrals Pattern 17

Take your time on this part, pivot at the points or sew from one curve to the next. You’ll see as you go from curve to curve that each cathedral window frame will either fold over the one your about to sew or can be tucked under. Go with the flow!

Alternate Quilting Method:

If machine quilting is not your cup of tea this pattern is great for using an applique stitch along the cathedral window frame and makes for a nice couch project. You can use the applique technique on just the top for less bulk.

9) Trim your extra batting and backing and bind your quilt!

Thank you to Betz and Riley Blake Designs for letting me play with this colorful line!

Happy Sewing!

Dutch Cathedrals Pattern 18

The Sewing Collective: Make n’ Bake Apron

My latest Sewing Collective project was all centered on a fun and classic piece of kitchen apparel!

Happy (almost) Fall everyone! Can you believe the busiest baking season is almost upon us once again? If you’re like me both fabric and baking obsessed, especially this time of year, I have the perfect pattern for you to try.

Present Perfect - Make & Bake Apron betz white

image from Present Perfect

The Make & Bake Apron from Present Perfect is not only exceptionally easy to make but it also looks stellar on. The pleated details make this one apron that’s anything but boring.

While this apron is very simple in construction making the long and narrow waist and neck ties may present a challenge. Try this tip on this pattern or any pattern that involves making straps or ties:

• You will need one tube turning kit (like the Dritz Quick Turn ) This little notion is incredibly handy. It’s the kind of tool that will make you wonder why you never thought to use one before.

• A paint stick, yes the kind that they hand out when you purchase your paint at the hardware store.

Once you have your first set of waist ties sewn right sides together, use your turning tool to quickly flip your tube right side out. Use the little wooden turning stick to help you poke out the ends of your tube and gently push out the seams.

Then using your paint stick gently slide it all the way to the end of your turned tube taking care to make sure your seams are straight and lined up on the sides of the stick. Next, with your iron set on the cotton setting, begin to iron your tube flat. I found the easiest way to do this is to nudge the paint stick along with the tip of your iron. Make sure to keep your seams even with the sides as you go along. You can see from the picture below that eventually your paint stick will slide out the end of your tube.

I can’t take all the credit for this technique as it was once handed down to me by a very kind and wise *coughBetzWhitecough* lady. It is, however, one tip that is worth noting and passing along to whoever you can.

Betz does mention that you can make this apron using cotton fabric or vintage sheets but I opted to use a cotton linen blend for its durability and lovely drape (all fabric is by French General for Moda, the main fabric is called Bon Voyage).

I did find this apron to be a bit long for my liking but it can be easily modified to fit any height by adjusting the hem, just make sure you measure twice before cutting! It’s also worth noting that if you’ve been graced with a fuller chest or you just aren’t into the full coverage style, you can make just the lower portion of the apron as the directions are broken down into bite sized sections.

Happy Sewing!

**This post is part of the Betz White Sewing Collective series. I am a compensated contributor expressing my own views and opinions.**

The Sewing Collective: Sweet Life Pillow Mod and Pattern Review

 Check out the fun twist I did on Betz’s beautiful Sweet Life Pillow pattern, below.

Present Perfect - Sweet Life Pillow

I love, love, love this method of applique. Reverse applique is one of my favorite ways to do applique. It’s a quick and accurate way of producing works of art that look like they took you days to whip up. Betz’s pattern from Present Perfect includes easy to follow step by step directions on how to create your own bee applique flawlessly.

Here are a few additional tips to make your Bee applique even easier:

• Prewash your applique rectangle and your felt rectangle in warm water, then press dry with a hot iron, no steam. This will allow your fabric and felt to shrink before you start sewing and reduce the amount of puckering later on.

• Use another sheet of stabilizer on the wrong side of your applique rectangle to help further stabilize your stitching. It also helps to keep the cotton fabric from stretching as you turn the bee.

• After you have finished sewing the bee applique and washed away the stabilizer and pressed it as dry as possible, continue to help it dry with your iron (cotton setting/no steam). With the felt side down gently press one quadrant at a time until no longer damp.

• Use a seam ripper to start your initial felt cut. It will allow you to gently poke between the two layers and run a long starting rip without fear of snipping thru both the felt and the applique rectangle beneath. Once you have your starting cut it’s much easier to get your scissors in between the layers.

I got a deep satisfaction from cutting away little bits of felt and seeing the fabric underneath. A little bit of effort for a huge impact. I chose this pattern for the WOW factor alone. It most certainly has flare. Have you seen Betz’s pictures of her students that have done this pattern, wowza!

The bee applique is the most complicated part of the pattern and once it’s done you can move on to the pillow front, a lovely hexagon shape that is easy to piece accurately with the help of the templates provided within Present Perfect.

I love how templates can help everyone achieve great results with minimal effort. Templates allow for consistency which is essential when sewing any triangle or hexagon shape. I, personally, hate it when my triangle or hexagon points disappear in the seam allowance after all my effort to be accurate in my cutting and sewing, so here’s a hot tip to get perfect points on your hexagon once you’ve sewn on all the triangle pieces.

Turn your finished center block piece over and look at the intersecting seams, you’ll notice that “X” marks the spot.

The key to getting a perfect point is to make sure your ¼” seam allowance stays above the “X”. Think of the “X” as the tip of your triangle or hexagon. You may find it easier to keep your “X” in sight if you sew with the center block (wrong side up) on top of your border strip.

The pattern continues on in a straightforward manner allowing you to complete a beautiful, stylish pillow in no time, but how could you do just one?! Betz has done such a great job creating this pattern that I didn’t make this just once, I made it three times!

Following Betz’s Sweet Life Pillow pattern, I created three separate bee applique pillow fronts and joined them together to form a Sweet Life Wall Hanging.

To make your own Sweet Life Wall Hanging here’s what you’ll need:

• 1 yd of main fabric for the front borders and triangle pieces
• 3 pieces of 8 ½” x 11” felt for your bees
• ½ yd of accent fabric for your hexagon
• 1 yd of backing fabric (this will be enough to make your binding too)
• ½ yd of batting
• 3 to 6 sheets of self-adhesive water soluble stabilizer
• ⅜” dowel rod, cut to the width of your wall hanging
• basic sewing implements
*** all seam allowance are ¼”

• Create your bee applique following steps 1-7 from the Sweet Life Pillow Pattern

• Cut (3) hexagons, (6) triangle pieces and (6) reverse triangle pieces using the templates provided with the pattern and sew them as directed in step 8 to create 3 center blocks.

• Cut (4) 2” x 16 ½” strips from your main fabric. Sew one strip to the top of one of your blocks and another strip to the bottom of the same block.

Repeat this for another center block for a total of 2 striped center blocks. You’ll have one center block without a top or bottom strip, this will become your middle center block. Trim excess strip fabric even with your block.

• Join your blocks together by sewing a striped center block to the middle center block. Finish it by sewing the last striped center block to the bottom of the middle center block.

• Cut (4) 2” x WOF strips for your side border pieces (these will be really long). Join 2 pieces to make one long continuous strip and sew to one side of your blocks. Repeat for the remaining two pieces sewing it to the opposite side to complete the side borders. Trim excess fabric even with the top and bottom of your wall hanging front.

• Cut (2) pieces of backing fabric (you may need to do some creative piecing here), sew together, and make your quilt sandwich (backing, batting, quilt top), baste it together and quilt as desired. Trim any extra fabric or batting even with the sides of your wall hanging.

• Cut (4) 2 ¼” x 44 strips for binding, join them into one long continuous strip.

• Cut (1) 3 ½” x 13” strip for your dowel tube, fold in half lengthwise wrong sides together and sew closed.

• Begin your binding on one of the long sides of your wall hanging. Bind until you get to the top and sandwich your dowel tube between your wall hanging back and your binding.

Continue sewing your binding, completing it as desired.

• Once your binding is finished insert the dowel into the tube and roll it up so it butts up against the binding. Whipstitch the bottom of the tube to the backing only all the way across. This will help your wall hanging to drape straight down with no bumps.

• Attach your beautiful bees and admire your work!

Hope you enjoy sewing this sweet pattern as much as I did! Happiest Sewing!

**This post is part of the Betz White Sewing Collective series. I am a compensated contributor expressing my own views and opinions.**

The Sewing Collective: Cluck the Chicken Doorstop Mod and Pattern Review

Cluck Chicken Doorstop betz white

Each year, as the gentle winds blow thru my house, the doors try to “fly the coop” resulting in sudden door slams, smashed fingers and trapped cats. Have you ever observed a cat stuck between a glass door and a screen? Utter hilarity, however, the cat disagrees.

I chose to make my chicken fun and colorful verses a traditional color combo.  You can see Betz’s version below from her book Present Perfect.

The pattern is simple enough that any fabric would work well with this, but I would recommend a good quality fabric since your bird will be sitting on the floor and taking a good amount of wear and tear over the years. I used an organic cotton called Alchemy by Amy Butler for Rowan Fabrics for the main body and wool blend felt from National Wovens. You could even use a lightweight outdoor fabric which is made for heavy wear and is often treated to resist dirt, water and mildew.  Here are some other quick tips that would make sewing your chicken a little easier.

Tip #1: Do a Puff Test
Once all your pieces are cut the next step is to sew the wings. After sewing around the perimeter of your wing, leaving a small opening, I recommend stuffing a very small amount into the wing and then doing a “Puff Test” by sliding it under your presser foot. If it doesn’t fit or you really have to wiggle it under, take a little bit of the stuffing out and try again. Once it fits, go ahead and sew your curved lines into your wings, then stuff a little more into wing to give it some more poof and then sew it closed. This method is a little more forgiving if you happen to over stuff you chicken wing and need to remove some.

Tip #2: Add Quilting
Since your chicken body will be lined with batting I chose to add quilting to my chicken. By adding quilting it will keep your batting from shifting around as you sew your body pieces together, just like in a regular quilt!

I did a simple diamond motif using my 3” ruler as a basic guide to space my lines at 1 1/2” and a water soluble pen. I also recommend a bigger stitch length for your quilting lines. I typically sew using a 2.5 length but for quilting I bump it up to 3.0. You don’t have to do this, but I like how it looks.
Of course you can quilt your chicken how ever you’d like, but if you’d like to do a diamond motif you can use the following method:

Take your ruler and measure how far apart you want your first set of lines to be, angling your ruler enough to make a nice diagonal. I made mine 1 1/2” apart to make it easy. The angle of your ruler doesn’t matter overly much, but you’ll want to slant it enough to make the diamond shape as you come back across.

Cluck Chicken Doorstop betzwhite #5

Once you’ve quilted the first body piece you’ll need to do the same with the second. To match the quilting lines to the second piece I laid my finished piece right side down on top of my ruler. You’ll see that I’ve positioned the ruler to be in line with the quilting.

Then lay your second piece right side up on top of the first, then mark your line spacing at the top and bottom of your chicken before removing your ruler from underneath. This will help give you a good reference point for evenly spacing your lines on the second body. Once you have your reference points, pull your ruler to the top piece, lining it up with your initial markings and continue your lines across the body.

Cluck Chicken Doorstop betzwhite #6

Finish marking and quilting your second piece. For the bottom piece I added straight lines going straight across at 1 1/2” intervals again. Make sure to use a damp wash cloth or towel to “erase” your pen marks when you’re done quilting.

I also decided I was going to make more of a Hen than a Rooster for my doorstop so I opted to not add the Wattle pieces and gave my little Hen some rosey cheeks instead. You can do this before you add the eyes, but I added my cheeks after the eyes were sewn on so I could see how the placement looked.

Cluck Chicken Doorstop betzwhite#7

Once you have your entire chicken sewn and stuffed you’re ready to add your weight. I found a nicely packaged bag of 4 pound decorative sand, though it totally looks like tiny gravel, in my local big box hardware store back by the orchids and tropical plants. I ended up weighing my bird down with the entire 4 pound bag, but the 2 pound recommendation would work well in most situations.

Cluck Chicken Doorstop #8

Tip #3: Truss Your Bird (aka sew it all closed)
When I was ready to sew my chicken closed I found the easiest way to do this was to place the bird upside down in my lap so that its body rested on top of my knees. This kept it from being squashed and prevented me from having to position my needle in an awkward position. It will make for a much easier sewing experience all around and won’t put as much tension on your thread as you pull the seams together.

No one ever said a doorstop should have to look boring and Betz has done a great job of coming up with a fun and very useful creation that would fit into anyone’s home. And remember, if chickens aren’t your thing, you could easily take away the comb and wattle and make a duck or a colorful bird!
You can find this pattern in Betz’s new book Present Perfect.

Happy Sewing!

**This post is part of the Betz White Sewing Collective series. I am a compensated contributor expressing my own views and opinions.**

The Sewing Collective: Tagalong Teddy Mod and Pattern Review

A month ago I debuted my pattern mod for the Tagalong Teddy pattern, found in Betz’s book, Present Perfect.  I immediately knew that I wanted to modify this particular pattern into another equally cuddly animal, a cat.

Tagalong Mod #10

This pattern is wonderfully simple in construction.  It would be a great jumping off point for any beginning sewer who is eager to try their hand at making a stuffed animal. I’d even recommend this pattern to any mom or dad who is looking to teach a younger son or daughter how to read pattern instructions and sew it all together. It’s that fun and simple.

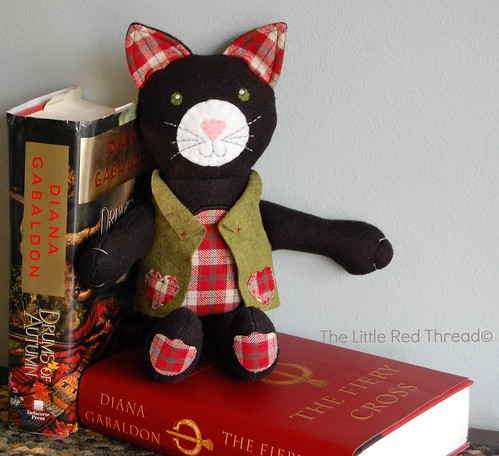
When I made “Jack” (every stuffed animal needs a name, right?) I opted to use polar fleece for his body instead of using a cotton terry knit or Minky fabric.  I like polar fleece for several reasons, but mainly because it has a modest amount of stretch and it hides stitches well.

Tagalong Mod #1

If you decide to use polar fleece instead of the recommended fabrics (terry cloth or minky), you’ll want to make sure you cut your fleece body pieces a  ¼” larger than the pattern piece to accommodate for the added thickness.

To make cat ears I sketched out a triangle on some extra tracing paper at about 2 ¾ “ wide and 2 ½ “ tall.  I used this pattern to cut both the ears and the ear applique pieces out.

Once all my pieces were cut out I decided to use the leg of an old set of flannel pajama bottoms for my Cat applique pieces. Tip:  If you use old pajamas, like I did, make sure that all the fabric softener has been washed out before using it in your project.  This will help the fusible webbing stick and not peel away.  It’s also good to mark what the front and back of your flannel looks like to keep your appliques looking consistent.  I noticed the front/exterior of the flannel had a fuzzier texture than the interior.

Tagalong Mod #2

I chose to cut a long rectangle out of my pajama leg and then fuse a smaller piece of webbing to the backside before cutting each of my pattern pieces out.  I did the same for any felt that needed to be fused on as well.  I did not cut these pieces any larger than the paper pattern.

Instead of blanket stitching around the tummy piece I chose to use a satin stitch.  The addition of the webbing on the back of the flannel will act as a stabilizer to keep the satin stitch from bunching the fabric.

Tagalong Mod #3

Tip: If you decide to do a blanket stitch around the tummy piece please note your flannel will fray some around the edges.  If you don’t like that kind of look feel free to add a small amount of Fray Check around the outer edge to help prevent this.

For the Cat’s tail I did a rough sketch onto the paper of the fusible webbing, fused it to my flannel then to the back of a body piece and then satin stitched around it.  My tail measured 3 ½ “ wide by 6 ½ “ tall.

Tagalong Mod #4

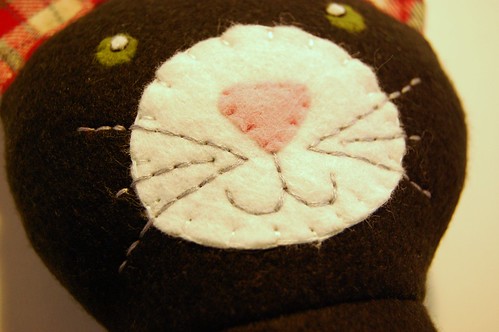
The face was simply a matter of adding some whiskers and lowering the nose placement to make a handsome cat face.  Changing up the eye color and stitching around the pupils also added a bit of animation.

Tagalong Mod #5

I added two little hearts on either side of the jacket and used a tiny bit of fray check to keep the edges tidy.  If you wanted you could fuse the hearts to the felt instead and blanket stitch around them.

Tagalong Mod #8

 The joy of this pattern is the ease at which the basic shape of the teddy can be turned into a completely new animal with simple details.  Imagine an orange tiger with stripes or a colorful pink panda made out of Minky!

What animal would you make or do you love your teddy bears?

Happy Sewing!

**This post is part of the Betz White Sewing Collective series. I am a compensated contributor expressing my own views and opinions.**

Betz White Sewing Collective

Woohoo! I have some fabulous news for you all!

I have been invited to participate in a Sewing Collective for the amazing Betz White. Yay!  This year long project includes nine other talented and fun crafty bloggers and I couldn’t be more thrilled (or even a little in awe) to be sewing along side them.

What’s a sewing collective?  Each of us have picked out a variety of patterns, designed by Betz, to showcase a modification or technique.  Each guest blogger will be showcased every Friday over on her blog starting March 6th!   Most of my project selections can be found in her newest book Present Perfect with one extra holiday ornament pattern thrown in for good measure.

I’ll be writing my guest posts over on her blog on these dates for these patterns:

April 17th: Tagalong Teddy from Present Perfect

May 1st: Cluck the Chicken Doorstop from Present Perfect

July 17th: Sweet Life Pillow from Present Perfect

September 18th: Make & Bake Apron from Present Perfect

November 20th: Winter Bloom ornament from Betz’s Holiday Collection

For now I have to keep all my modifications under wraps until my guest post is published, but you can catch hints of what I’m working on over on Instagram ^_~

Hope you’ll join us for lots of fun, crafty inspiration and maybe even make a few friends along the way.

Happy Sewing!

Secret Project #1

This last week has been very long with multiple rounds of colds and fevers going thru each of us.  A mandatory “creative” break had to be enforced so everyone could recover fully.

Now that we’re all on the mend I can start on part of a Secret Project I’ve been invited to work on this year.  While I have to keep hush on it for now, I’ll be able to share more of what these projects are being brought together for in a few more weeks.

In the meantime, remember it’s only 5 more days till March 1st and Spring is almost here!!

Soft Mod: The “Gentle-Lady’s Travel Case”

You might recall my book review for Present Perfect by Betz White and in it was the pattern called The Gentleman’s Travel Case.

I worked on this pattern as a tester and found it to be surprisingly easy to make. I don’t usually make bags or things of that nature very often, so I enjoyed the natural way the directions flowed together.

This is what I’d like to called a “soft mod” of a good pattern.  There were only two things I changed, the strapping on the top and handle and the colors.  Easy changes to make it a bit more girly.

The strapping that lays over top of the case is actually covered with the same fabric that I used for my bag interior.  I had plain, ol’ white strapping and it was boring.  To jazz it up, I took double-sided fusible webbing, fused it to the flower fabric and then cut it the length of my straps. After that it was only a matter of fusing the fabric to the straps being careful to fuse both the front of the strap and the back.

I did the same for the handle and if you wanted you could even do it to the little pull tab at the end of the bag.

Insta pretty!

It’s also fun to use coordinating thread in a bold color.  In my case I matched my thread to my pink zipper.

I love the way the interior came together in this particular bag.  It is a little tricky to sew it closed at the top near the zipper because there’s not a lot of space to maneuver well.  I did wonder, in hindsight, if I could have turned the bag inside out so the interior would be on the outside making it easier to hand sew along the underside of the zipper.  I can’t say if that would have worked out well, but if you end up making this I’d say give it a try!

Happy Sewing!