The Feather Quilt (DONE!)

Allison's Wedding Quilt
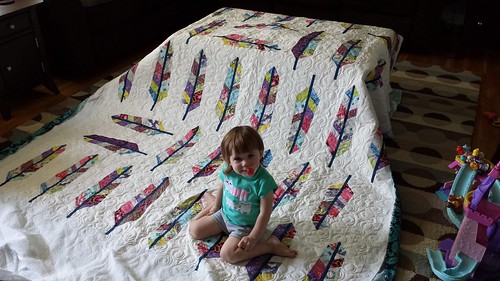
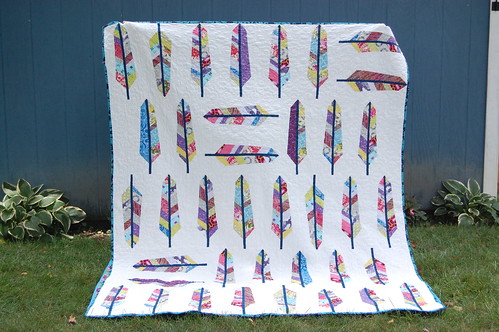
It’s DONE! Completed, boxed up, lovingly given and well received.
I’ll admit to being extremely attached to this project.
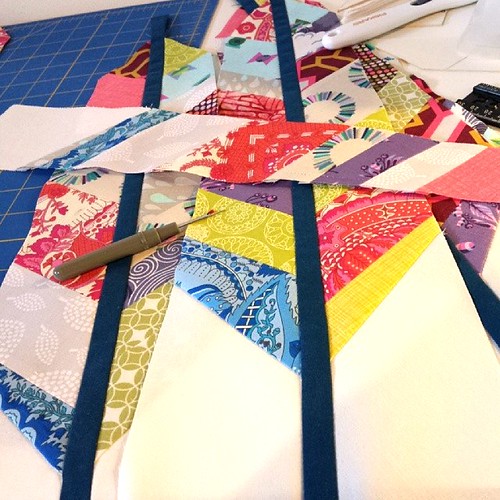
It certainly was a love/hate relationship with all the pattern woes, but I am so immensely proud of the final result.  I even got a little weepy before wrapping it up.  It’s hard to part with something you’ve put so much effort into, especially knowing you’ll never see it again.
012 (2)
Untitled
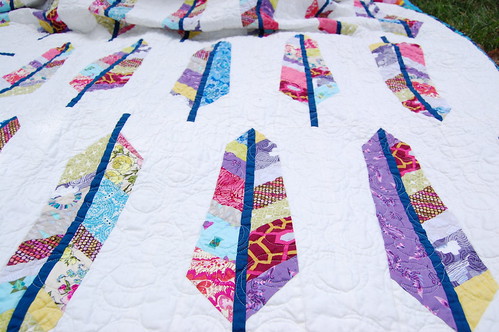
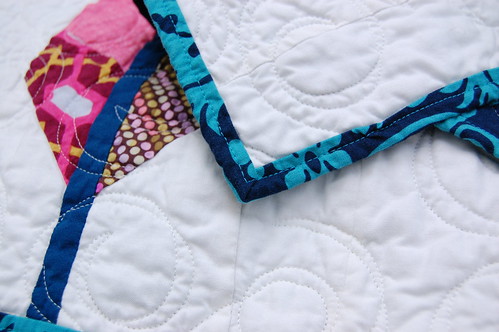
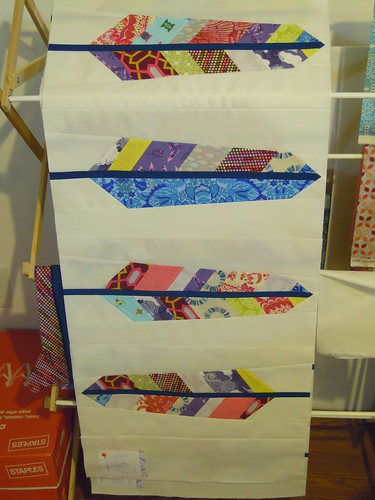
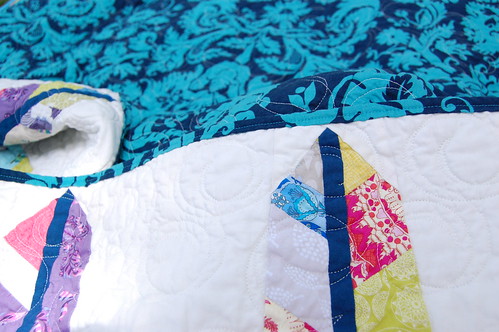
The main backing fabric looks so uniform, which surprised even me seeing as it’s split down the middle and sewn back together to make 2 seperate pieces.  Even the pieced section looks remarkably “intentional”.
Pieced backing
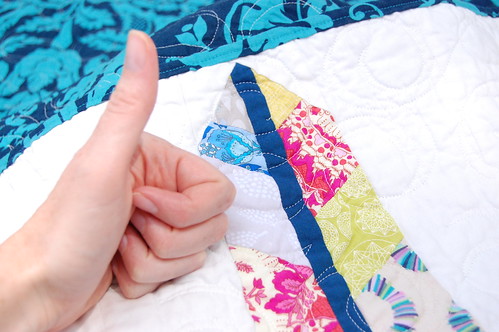
And those points.  I feel like I could’ve almost entered this in a competition.
Perfect Points
020 (3)
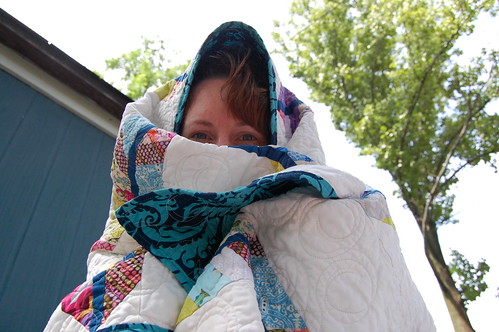
Even if it’s hot (Summer finally showed up over the weekend here in the Midwest) never underestimate a good final quilt snuggle.
It's MINE!
Happy Quilting!

The Feather Quilt (Part 5)

Allison's Feather Quilt 2014
Check it out!  The Feather Quilt is all quilted up!
Thanks to Missouri Star Quilt Co. for doing another fabulous job and staying true to their turn around time.  I haven’t measured the quilt since I’ve got it back, but I swear I lost about 2 inches on all sides from the density in the quilting.  While I’m not nuts over how the quilting pattern turned out (the loops were alot closer together than I thought they’d be) it will work out for the best.  Quilts that will see lots of use and wear should be quilted more densely than, for example, a wall hanging.
I’m trying to decide if I’ll bind it in the backing fabric or do a scrappy binding from left over fabric remnants.  I’ll need to sit down and look at it first, but that also means I’ll need to clean my floor of all the thread bits again.  I’ve been going back and forth about washing this one before giving it away.  I wash 90% of all my quilts before gifting them mostly because I’m paranoid of stitching pulling out or colors running. Since this quilt is dominated by white space, it’s probably in my best interest to wash it prior to wrapping it up. This means I’ll be throwing in 5+ SHOUT color catcher sheets to make sure the white stays white.
This quilt’s absolute completion date is set for August 22nd.

The Feather Quilt (part 4)

 38 blocks are squared up.

003

Laid out, sewn together and neatly pressed to make 5 rows of funky feathers.  Those rows are about 72″ long, this is a very huge quilt.

004

Sadly, the backing fabric I had fallen in love with only had 5 yards left on the bolt and I most definitely needed 5 1/2 yards of fabric.
008 (2)

I went ahead and bought the 5 remaining yards not sure how I was going to add in another 1/2 yard of fabric.  Once I was home and laid everything out on my floor I realized that I may have just “painted myself into a corner”.  I had to walk away for a full 2 days before I could look at it again, I was that aggravated. Finally, after tearing thru my fabric stash and much creative cursing, I found a few coordinating strips of fabric from an old Moda jelly roll.

006

I was hesitant to cut my backing seeing as it was already short, but I did it anyways and in the end it was the smartest move I could have made.  Not only did it give me enough length to complete the backing, but it added another mod feature to the normally “boring” back of the quilt.

It was shipped out Memorial Day weekend for quilting and I couldn’t be more relieved to have it off my sewing table and floor for that matter.

The Feather Quilt (part 3)

014
I’m in the homestretch now and it’s been a long and tiring haul.  I’m at the point where my sewing studio is looking more empty as the last bits of fabric are cut up and sewn into the quilt.  There’s been a copious amount of seam ripping and cursing and new template cutting too.  I’ve also sewn thru 876 yards of thread so far.
Thread for days.....
I’ll be switching to white thread for sewing all the rows together, but first things first, I have to lay out all 38 blocks and find the smallest one so I can square all the other 37 blocks to that measurement.  The hubby is excellent for helping me get thru this stage.  I cringe every time I need to square a block up.  It’s hard to cut off a sliver here and there to make sure everything is as perfect as possible.
I still think everything has come out very nicely despite the terrible scaling issues with the pattern we’ve had to overcome.  I’m very pleased with the accuracy of all my seams and am still keeping my fingers crossed that all my obsession with perfect 1/4″ seams will pay off overall.
Nailed it!
I will not miss the enormity of the ironing I had to do with this quilt either.  As I was sewing the last blocks together I noticed that I had been simply throwing them into a pile on my ironing board.
Getting ready to iron
Some things you just get so tired of doing, even if it’s for the greater good.

The Feather Quilt (part 2)

030
I have more pictures that I need to get uploaded so you can check out the progress in more detail.  Yes, there is progress, but it feels painful.
This quilt pattern is truly giving me fits.  I plan on writing the editors of Quilty again to inquire if anyone made this quilt prior to publishing it (other than the designer).  It’s a really cool pattern, no doubt, but the templates, measurements and complexity of it make it more of an intermediate quilt, not a beginner.
There’s actually alot of skill and patience needed to even get thru the feather piecing parts.  It’s challenging me and I’ve been piecing quilts for over 10 years now.
I think for each of the 28 feathers I’ve sewn so far, every single one of them as had at least 2 of its seams ripped out at least twice, some of them have been ripped out and sewn 3 separate times!  Yes, I am being a little picky trying to get everything lined up properly, but it’s a finicky pattern with its angled pieces.  I thought I could get away with a few “off” seams, but in the end I realized the mistake would only amplify the bigger the block became.  That means that it’s taking a very long time to piece the blocks and I’m only half way done.
I don't always rip out seams
Ripping out all those seams also makes me realize I should invest in a larger, more comfy seam ripper.
It’s worth noting all of my seams on the “feather” portion of the block have been pressed OPEN to help it lay crisp and flat when I was cutting out all the feather sections.  I believe it’s important to press seams open when you’ll be using a template to cut your actual pieces.

The Feather Quilt (Part 1)

My cousin Allison is getting married in August this year and I politely inquired if she would like a quilt as a gift?  She was very enthusiastic about the idea and I promised her it would be a nod to her more “modern” style.
021
(so. much. fabric.)
The pattern I’m using is called Feathers by Anna Maria Horner.

(not mine^^)

It can be found in Quilty’s Winter 2012 issue.  I’ve actually worked out of this Quilty issue before for Corbin’s Quilt and have had my eye on the Feathers quilt for well over a year now.
I’m not sure how I thought this pattern would be easier than most, maybe because it’s mostly strip piecing and then cutting, but it requires a copious amount of fabric.  Copious, as in, 14 assorted prints in 1/4 yd pieces, 5 assorted fat quarters and, I believe, 5 1/2yds of white for the background.
Fabric for days......

I couldn’t even fit all the fabrics in the picture and truthfully there are 3 of the fabrics that don’t seem to work as well as I’d hoped.  When you’re trying to find the much fabric in a quilt shop it can just be overwhelming.  So I’ve had to rummage thru my stash to come up with substitutes, but, to be frank, 14 assorted prints just isn’t enough variety and this quilt THRIVES on variety.  I think it would look hot using vintage fabrics or even doing  it all in ombre hues for the feathers.
I really want to make this quilt again using the ombre idea, but that will have to wait.

Wish me luck as I start on this humungous project.
The projected size is 72″ x 90″ (pretty much a Queen sized quilt).