The Olde Towne Quilt

Quilt: Olde Towne Quilt

Pattern by: Kathy Schmitz for Moda

Finished size: 49 x 59

IMG_20170804_171901_920

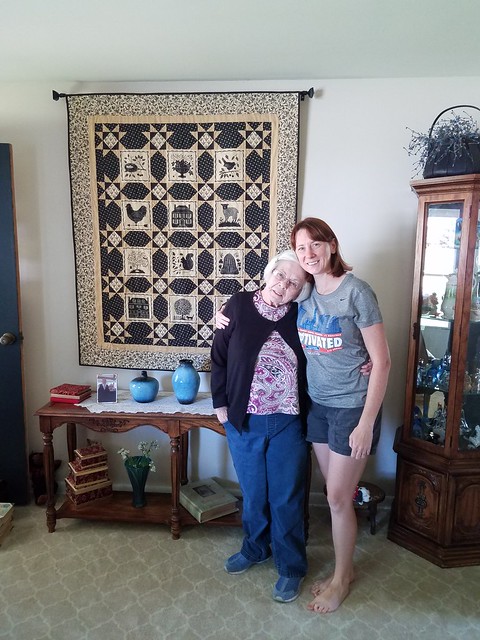
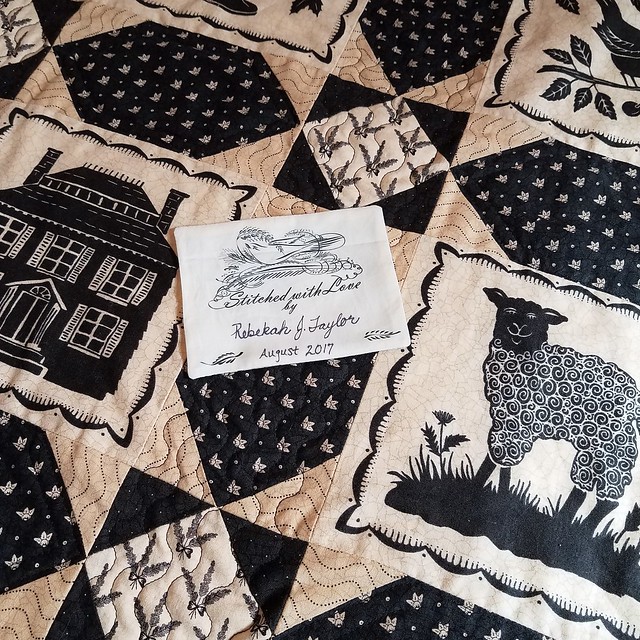
Last month I was finally able to gift the Old Towne Quilt to my Grandma Brewer.  This was such a satisfying make to finish because it was my way of thanking her for teaching me how to sew.  A visible tribute to her and a way of showcasing my current skills which have come a very long way since my first quilt back in 2005.

This was originally supposed to be gifted in November of 2016 around her birthday but a series of unfortunate events led her to become very ill for several months. It was only about the middle of spring 2017 that she was finally able to return home. It wouldn’t be till August when she was finally strong enough to attend my daughter’s 5th birthday where I showed her the quilt before it was bound. She was speechless.

My Grandma never thought that teaching a very stubborn and easily frustrated child to sew would have lead to creating quilts, costumes, ornaments, and a bounty of so many other creative outlets. Yet, it somehow did and she is so very proud and amazed.

Old Towne Quilt 2017

My Grandma is 82 years old and I know this quilt won’t hang forever on her wall, but I know she’ll think of me every time she sees it. It’s hard to imagine a future not being able to show her all the new things I’m working on or talking about techniques and sewing woes. Learn from everyone you can while you can. We are all given such a short time to live an amazing life.

xoxo Love you Grandma xoxo


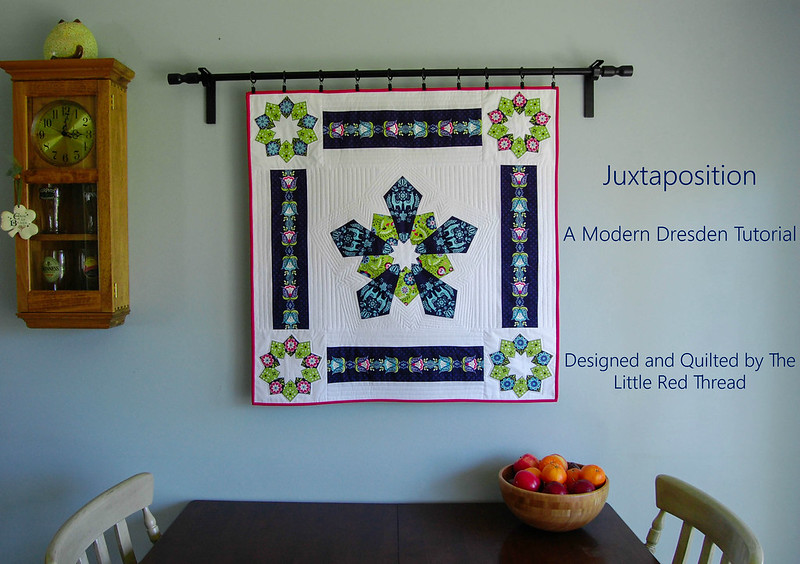
Juxtaposition: A Modern Dresden Tutorial

Juxtaposition Title

Juxtaposition: A Modern Dresden

Designed and Quilted by Rebekah Taylor of The Little Red Thread

Finished Size: 34 x 34

I had the honor of designing another fun project from Betz White’s newest fabric line Juxtaposey for Riley Blake. The color in this line is LUSCIOUSLY saturated.  They range from bold red and gold to fuschia and navy. There is something for everyone’s palatte in these eccletic world-inspired designs.  And guys, there are llamas.

L-L-A-M-A-S

Nevermind that one of my favorite movies is the Emperor’s New Groove or the fact that I have several llama figurines.  I mean who knew llamas were such a popular, lovable animal? So when Betz asked if I wanted in on designing another project for her latest line there was no hesitation.

llama face

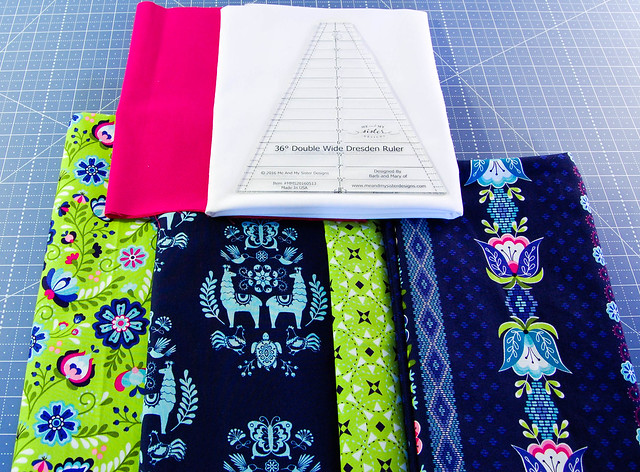
This pattern was designed using the Double Wide Dresden ruler by Me & My Sister Designs.  All fabric requirements are based around the use of this ruler.  The Double Wide ruler allows you to use only 10 fan blades to complete a circle verses a traditional Dresden ruler where you have 20 blades.  Because you are doubling the width of the fan blade these dresdens are not only made faster but are finished at both ends eliminating the need for a center circle.

SUPPLIES
Fabric:

¾ yd Posey Stripe Navy (tulip stripes and small dresden blades flowers)
½ yd Posey Medallion Navy (large dresden blades)
¼ yd Green Posey Main (medium dresden blades)
¼ yd Posey Star Green (small dresden blades)
1 ¼ yds Solid White (background)
1 ¼ yds White (backing)
¼ yd Pink (binding)
Juxtaposition Wall Hanging

Notions:
Double Wide Dresden Ruler by Me & My Sister Designs
Thread
Scissors
Turning tool/chop stick
Iron
Spray starch
Basting supplies

———–

All pieced seams are sewn with 1/4″ seam allowance
All seams are pressed opened to reduce bulk

Blade Cutting
———————

Center Dresden:

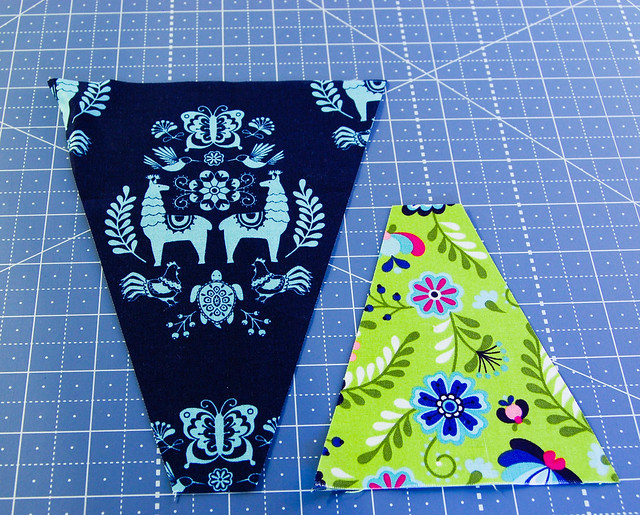
1. Cut an 8” wide strip of the Posey Medallion Navy aka The Llama Medallion.  Line up the 8” line at the bottom of the ruler onto the edge of your fabric, centering a llama medallion as best you can.  Cut 5 large blades.

2. Cut a 5” wide strip of the Green Posey Main. Line up the 5” line at the bottom of the ruler onto the edge of your fabric. Cut 5 medium blades.
Juxtaposition Wall Hanging

Corner Dresdens:

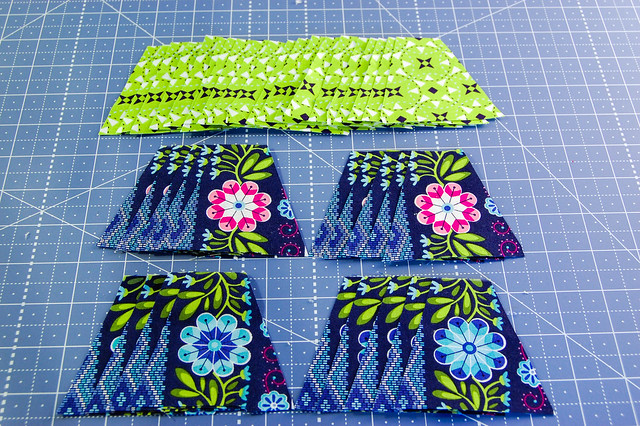
3. Cut a strip of the posey flowers off of the Posey Stripe Navy, then carefully fussy cut the pink and blue flowers using the 3” line on the Double Wide Dresden ruler as a guide. Take your time, this is the hardest part. You may find that you will need to cut another strip to find enough usable flowers. Cut 10 small blue flower and 10 small pink flower blades.

4. Cut a 3” strip of the Posey Star Green then using the 3” line on the ruler cut 20 small blades.

You will have a total of 40 small dresden blades.
Juxtaposition Wall Hanging

Dresden Assembly
——————————

1. Take a fan blade and fold it in half lengthwise. I like to give mine a quick press with my iron to crease the fold line, finger pressing works well too.  Sew ¼” at the top and bottom of the blade. Clip the inside corners just enough to reduce the bulk being careful not to cut through your stitches.
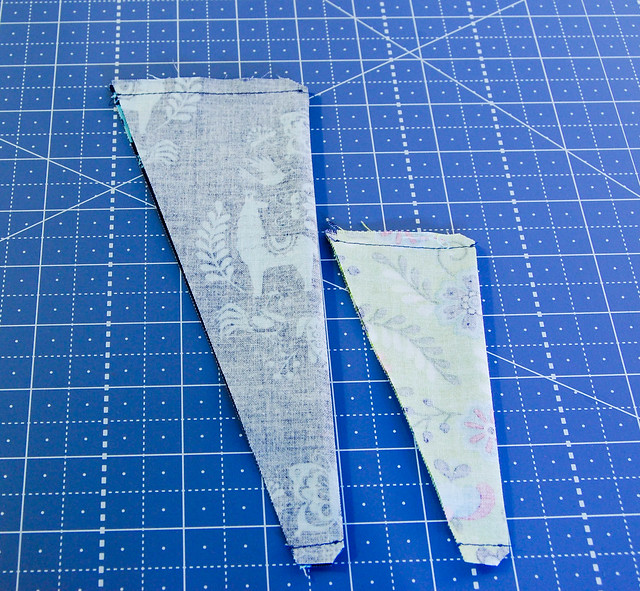
DSC_0093

Press open the seams on each end of the blade using your fingers then turn each end right side out. A turning tool or chopstick is especially helpful for poking out the points, be gentle so you don’t push through the ends!

2. Flip your blade so the back is face up and line up the seams you finger pressed open on the center fold line you creased in step 1.  This centers your points. Carefully press them flat with your iron and a bit of steam.
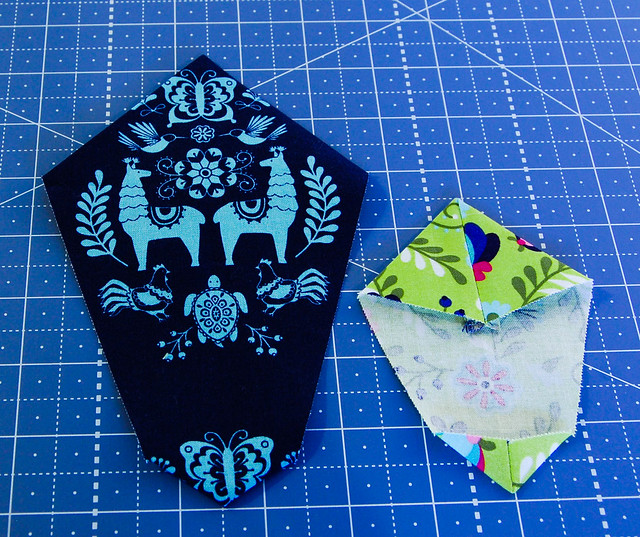
DSC_0094

Continue steps 1-2 until all your blades are done.

3. When all your blades have been sewn and pressed, arrange 10 blades to form a dresden plate in the pattern you like best.  For example, for the corner dresdens I used the green print then a blue/pink flower and alternated between those for the corner dresdens.

4. Starting with one dresden plate, take two blades place them right sides together and sew  them together starting at the bottom end of your seam.  As the center of this dresden is exposed rather than hidden your eye looks to the center first. Sewing from the bottom up will also keep your center points aligned all the way around.
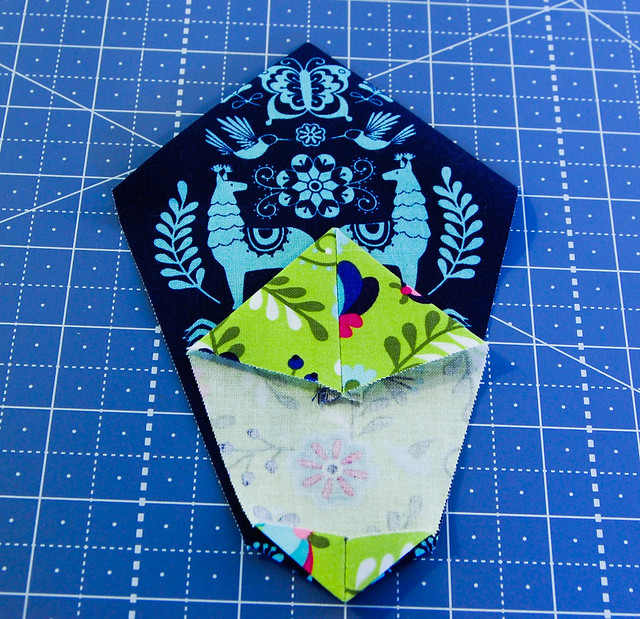
DSC_0095

*Tip* On the Center Dresden one blade is larger than the other. To keep the exposed sides tucked under on the larger blade go ahead and continue to sew the whole side once you pass the end of the medium blade seam.  When you press your seam open the stitch lines will create a natural exact ¼” for you to press under.
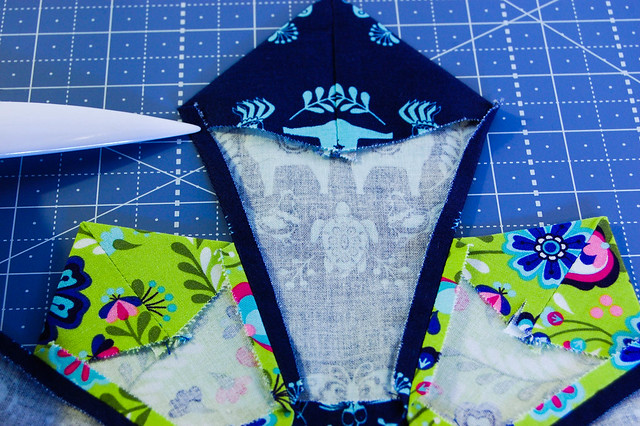
Juxtaposition Wall Hanging

5. Sew and press your blades in groups of 5. For the Center Dresden you will have alternating sizes.

6. Once you have all your blades sewn in groups of 5, take 2 matching blade groups and place them right sides together. Sew from the bottom up, press open and you will have a finished dresden!
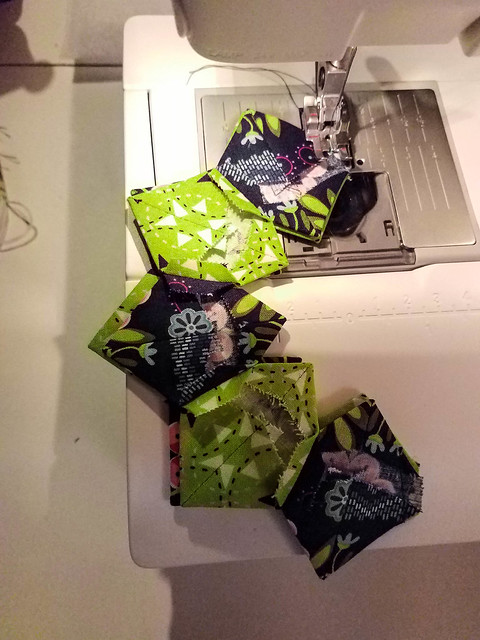
Juxtaposition Wall Hanging

Repeat steps 1-5 (3) more times for a total of 4 small corner dresdens and 1 large center dresden.
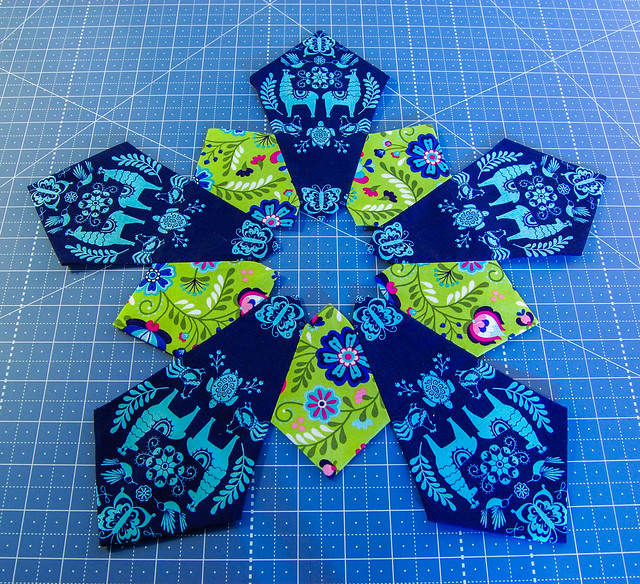
Juxtaposition Wall Hanging

Attaching the Dresdens
————————————–

1. Cut one large 19” x 19” square and (4) 9” x 9” squares from your white background fabric.

2. Fold your squares into fourths and press the center just enough to make light creases. When you open them up you’ll have your exact center for each block.  Use the center points and crease lines to line up the Center Dresden on the 19” x 19” block. Pin in place being careful not to shift it too much.  Do the same for the (4) Corner Dresdens.

3. Sew on the dresdens to the background using any stitch you’d like. I used a machine blanket stitch.
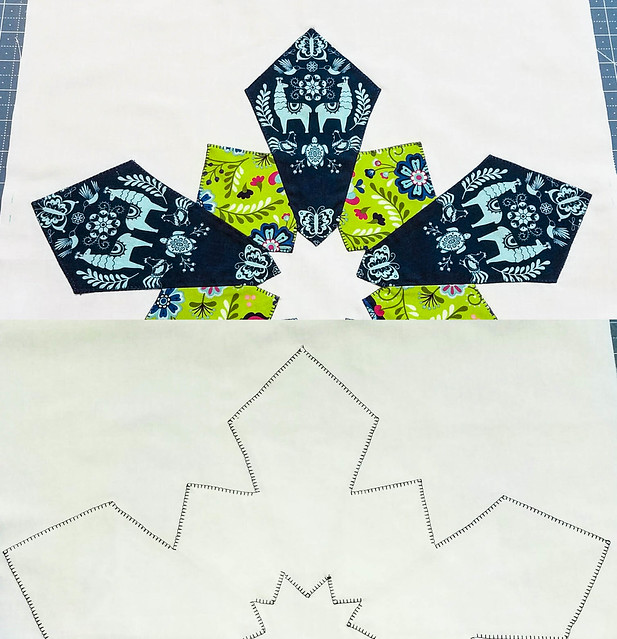
Juxtaposition Wall Hanging

4. Lightly press your completed dresden block and measure your block again.  It may have shrunk ever so slightly (especially if you used a blanket stitch).

Square down your Center Dresden to 18 ½” square and your (4) Corner Dresdens down to 8 ½” square.  Take your time doing this and always measure twice before cutting.

Set squared blocks aside.

Tulip Border Assembly
———————————–

1. Using the Posey Stripe Navy fussy cut a 4 ½” wide strip of tulips the width of your fabric. Cut 2 long strips. Cut each strip into 18 ½” lengths for a total of (4) 4 ½” x 18 ½” long tulip strips.

2. Using your remaining white background fabric cut (4) 2 ½” x 18 ½” long strips.

3. Sew one white border strip to one tulip border strip, press seam open.  Then sew a second white border strip onto the opposite side of the tulip strip. Press seam open.

Make 4.

Quilt Top Assembly
——————————–

Layout your top using the finished picture as reference.

Start by assembling the Corner Dresden blocks and Tulip borders into horizontal rows.

1. To create one horizontal row take one Corner Dresden keeping your center point pointing up and sew one Tulip Border to the bottom of the Corner Dresden block, press open.  Take a second Corner Dresden, with the center point pointing up and sew that to the bottom of the Tulip Border.

Each Corner Dresden block should have its center points oriented in the same direction.

Make 2 rows like this.

2. To create the middle row take one Tulip border and sew it to the top of the Center Dresden (make sure your Center Dresden’s center point is oriented up), press seam open.  Sew the remaining Tulip border to the bottom of the Center Dresden and press seam open.

3. Sew the Corner Dresden rows to the middle row, press seams open.

Finishing
—————

1. Make your quilt sandwich (quilt top, batting, backing) and baste together using your favorite method.

2. Quilt! Quilting doesn’t need to be super fancy to have a wow factor. Sometimes straight lines carry a big punch.
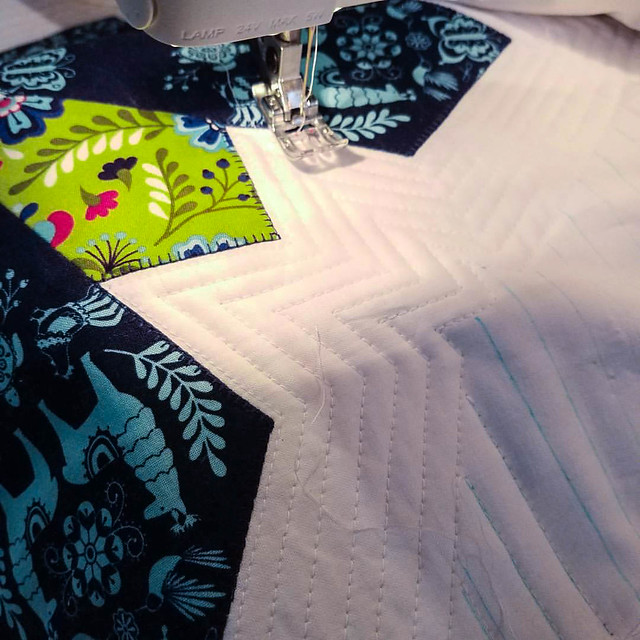
Juxtaposition Wall Hanging

3. Cut 4 strips 2 ¼” wide the width of fabric from your pink fabric for your binding. Attach binding.

Juxtaposition Wall Hanging

Hang your new wall hanging in a favorite spot and enjoy! If you like how the one in the picture is displayed you can purchase the curtain rod and hangers at Ikea.

Juxtaposition Wall Hanging

I hope you loved this new pattern! It was quite a challenge to design but I learned so much from making this and I have found a new love for all things Dresden. Thanks also to Riley Blake and Betz White for providing the amazing fabric used to create this project!

Remember this pattern is free for personal use only, please respect copyright laws.

Happy Sewing!
Science Fair Quilt

Science Fair

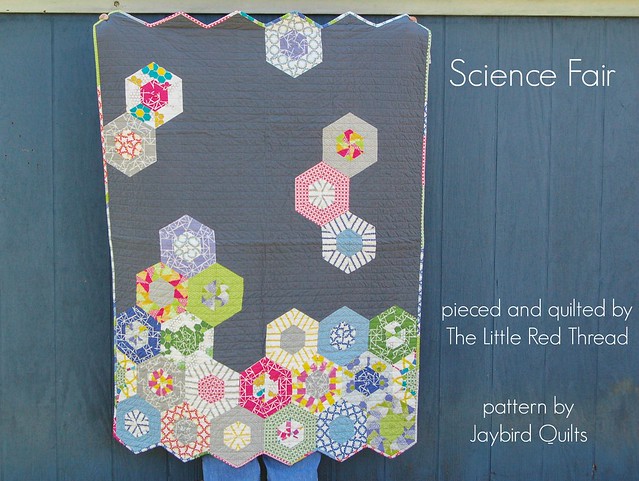
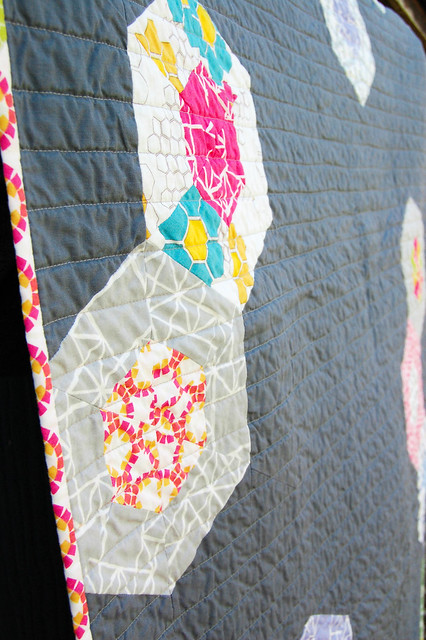
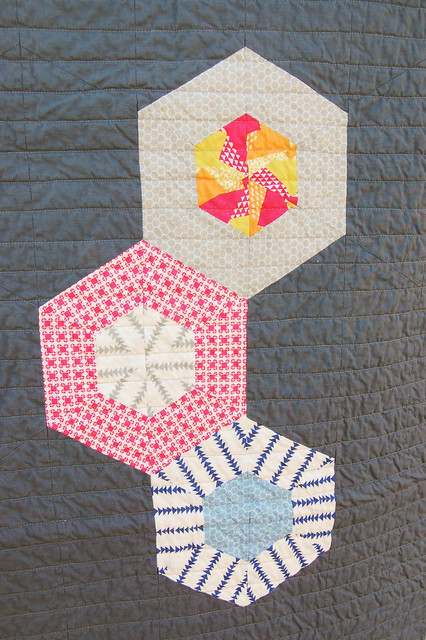
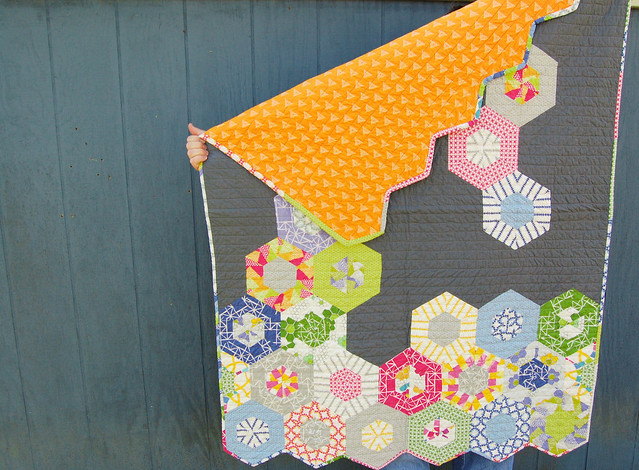
Hooray! My first finish of 2017! This quilt has been sitting on my bucket list for over 2 years and has been a WIP for just as long. Despite the wind the sun made a rare appearance and we got all of our pictures done.

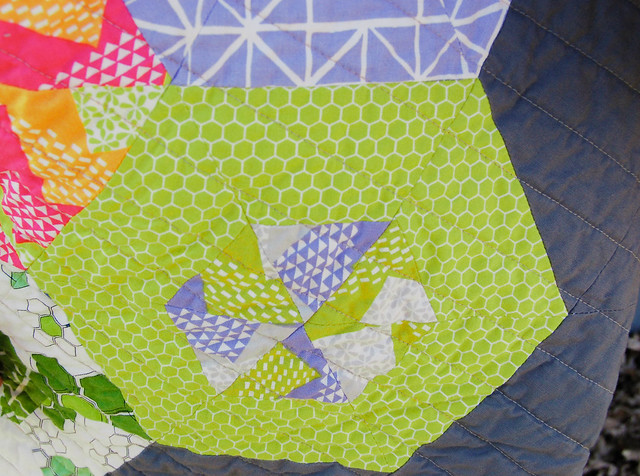
Science Fair is a pattern designed by Julie Herman of Jaybird Quilts. Julie is well known for her geometrically inspired designs and her clever quilt rulers. Without her Hex n’ More ruler this pattern would have been darn near impossible to make without alot of beer and cursing.

I specifically picked this pattern because my sister Sarah, who I made this for, and her husband are both chemistry and math geeks. Anyone who knows my undying hatred of math (except algebra, you’re cool) should know that this quilt was finished by sheer willpower and the love I have for my youngest sibling.

Science Fair Quilt 2017

Science Fair Quilt 2017

Science Fair Quilt 2017

Science Fair Quilt 2017

It’s always good to have a tall person handy for a quilt shoot.

Happy sewing!

The Olde Towne Quilt

Starting a

As running season slows and things become less hectic I’ve started work on an overdue present. In between my Birchen Quilt and some smaller side projects I unearthed from my stash the Olde Towne pattern.  It’s still new-ish and the fabric, Sturbridge by Moda, is still widely available in stores and online.

Every now and then I’ll dive back into one of my original favorite quilt motifs, primitives. There’s something earthy about the look of a “prim” quilt. The fabrics tend to be darker, more monotone but no less rich and spectacular. I also like that most primitive quilts are simple in design.

This pattern is a good sized wall hanging with a decent amount of challenge. Several intersections have proven to be quite difficult to match on top of making sure each point is centered with the one in the previous row.

So many tiny squares to triangles. I predict lots of squaring up in the next week.


It has been alot of marking.  I’d much prefer sewing half square triangles in a traditional fashion compared to sewing on corners.  There is definitely a finesse to sewing just slightly to the other side of the marked line for a perfect matching triangle once they have been pressed up and back. Squaring them up has also been a challenge.  But nothing in quilting is ever exact and I certainly try not to focus overly much on the small off centered seams that can not be avoided once in a while.

To infinity and beyond! *chain piecing has its perks, but can get boring fast* #quiltersofinstagram #chainpiecing #arewedoneyet #showmethemoda

But I’ll be honest. Off centered seams grate on my aesthetics and overall sense of, WHY IS THIS NOT MATCHING PERFECTLY!!!!!!  It’s a vice.

Honestly, work to the best of your ability.  Rip out those seams if you have to and sew them back. When I find myself consumed with the tiny details I step back and look at the overall picture….and have a beer if I’ve remembered to stock up from my last grocery run.

But perfectionism is for the birds. And things, even in Nature, are rarely perfect.

Focus on the bigger picture when you need to re-center. And have a beer and maybe some leftover Halloween candy.  Then come back to it and soldier on.

How did I ever live without a design board? #showmethemoda #primitivequilts #primitive #modafabrics

Scaling Up & Moving On

20160801_155546

I always joke that with each quilt I make I learn something new.  I have yet to not learn a lesson, a skill or otherwise handy piece of knowledge that can only come from making mistakes and then figuring out how to fix them.

I have little to no experience when it comes to using large scale prints.  I tend to stick to the safe and narrow land of small scale prints or solids.  Boring but like I said, safe.  I’ve been steadily gaining ground on The Birchen Quilt over the last few weeks up until last night when, at long last, I had all my blocks sewn, pressed and ready to layout…..

IMG_20160926_163026

(forgive the picture it was a quick Instagram snap and I couldn’t even fit the entire layout on my wall)

What I saw made me cringe a bit inside.  The fabric I’d fallen in love with was overwhelming a very cool pattern. I mean the prints were just beating the pattern into submission and it was not pretty.  A few choice phrases, some distracted sewing and an hour later I regrouped my ravaged pride and decided that I only had two choices.

  1. I could leave it as is and love the craziness that is MY quilt and my fabric choice. This is the first quilt I’ve ever made for myself.
  2. I could rip out the seams of all the Elizabeth bust triangles and find a less glaring print for those 8 blocks *cry*.

But I am SO.TORN.

I mean I am seriously bummed out.  Those blocks are not small (19″ x 19″ as pictured). I love every piece of fabric I picked out and I have sewn over 300 half square triangles and squared them up.  This quilt top has so much work put into it, but it is definitely not what I had in mind and that is very depressing.

I am determined to make this pattern work so for now I’m putting this quilt on hold, stacking up my beautiful blocks and diving into another project while I mull over my two options.

Lesson learned: The scale of your prints is just as important as the color palette.

Dutch Cathedrals: A Mini Quilt Tutorial

Dutch Cathedrals Pattern

Betz White’s new fabric line Dutch Treat for Riley Blake is a beautiful and charming homage to Pennsylvania Dutch design.  I was lucky enough to get my hands on some yardage before it shipped at the end of June and immediately delved into some research.  The Pennsylvania Dutch are not, in fact, from the Netherlands, but are made up of several groups of immigrants from both Germany and France.  As I looked further into the history of the region I found my inspiration in a traditional cathedral windows pattern.

Dutch Cathedrals is a summer fresh mini quilt that looks complicated but is wonderfully easy to accomplish.

Finished size: 24″ x 24″

SUPPLIES
Fabric:
1/2 yd Dutch Wreath Gray
1/2 yd Dutch Stripe Gray
1/2 yd Dutch Floral Green (background)
1/2 yd Kona Cotton in Peapod (background)
3/4 yd Kona Cotton in White (cathedral window frames)

1 yd for Backing
3/8 yd for Binding

1 yd of batting

Notions:
thread
scissors
iron
spray starch
basting supplies

Optional:
Basting glue or Elmer’s School glue for holding your window centers in place
——-
All pieced seams are sewn with 1/4″ seam allowance

All seams are pressed opened to reduce bulk
——-

Cutting:
– Fussy cut (9) 4 1/2″ square flower medallions from the Dutch Wreath Gray
– (4) 4 1/2″ squares from the Dutch Stripe Gray
– (16) 4 1/2″ squares from the Dutch Floral Green
– (20) 4 1/2″ squares from the Kona Cotton in Peapod
– (52) 4 1/2″ squares from the Kona Cotton in White
– (3) 2 1/2″ strips for binding

Cathedral Windows Pattern

Block Assembly:

1) Lay out (4) matching squares of either of your green background fabrics.
Dutch Cathedrals Pattern

2) Take (4) of your white squares, press in half and lay one pressed half square on top of one green background square. Make sure that the raw edges of your white half square match up with the raw edges of your background square. Dutch Cathedrals Pattern 2

Dutch Cathedrals Pattern

3) At this point it’s very helpful to do a full layout of your pattern and take a picture of the final layout. Dutch Cathedrals Pattern 4

Dutch Cathedrals Pattern 5 Dutch Cathedrals Pattern 6

Dutch Cathedrals Pattern 7 Dutch Cathedrals Pattern

4) Start assembling a full block. Pull one full block aside along with all of the pressed half squares on top.
Dutch Cathedrals Pattern 9 Stack the pressed half squares on top the opposite side taking care to make sure your raw edges are lined up with the finished pressed edges in the middle. Then place the right side of your green background fabric on top of your pressed half squares, pin to avoid the fabric shifting and sew together.  Press seams open.Dutch Cathedrals Pattern 10

***Hint, always double check that you’re sewing down the correct side!***

5) Open up your sewn units
Dutch Cathedrals Pattern 11

and then place the bottom unit right sides together with the top unit. Your triangle points will meet up. Line up your center seam, pin, sew, press seam open. Dutch Cathedrals Pattern 12

Repeat steps 4 & 5 for the next 8 full blocks.

Finished block should measure 8 1/2″ square

Quilt Top Assembly:

6) Once you have all 9 Full Blocks sewn arrange them according to your layout picture. Note that you are not sewing your window centers in this step. Set the window centers to the side once you double check your layout.
Sew your full blocks together to create 3 rows. Check that your center seams align with each block addition, these will ultimately become your cathedral window frame points. Also double check the layout as you go after sewing each full block, press seams open. Then sew your rows together being careful to match your center seams again and press open.

A helpful way of lining up your centers is to take a pin and place it through the center seam of the top block then match up the center of the block below it, press the pin through that seam and pin in place.
Dutch Cathedrals Pattern 13

7) Cut your batting and backing two inches bigger than your quilt top. Make your quilt sandwich and center your quilt top. Dutch Cathedrals Pattern 14

Baste in place with your preferred method. I used my Kwik Klip tool with my safety pin “grips” by Quilter’s Delight.

***Hint, it may be helpful to put a dot of basting glue/Elmer’s School glue on the back tips of your window centers to hold them place so they don’t shift.***

Don’t be afraid to ask for help.
Dutch Cathedrals Pattern 16

8) Start quilting. Start at the tip of one of your white triangles and pull the edge of your white triangle over the center window block. You’ll notice that it will naturally curve inwards. Pull the curve in and finger press it some then sew about an 1/8th of an inch away from the edge of the cathedral window frame. This will catch the center block, sew the cathedral window frame in place AND quilt the top at the same time! Hooray for multitasking!

***Hint, it may be easier for you to sew the cathedral window frames down if you iron them towards the window centers prior to quilting vs. finger pressing them in as you go or use small dots of your basting glue.***

Dutch Cathedrals Pattern 17

Take your time on this part, pivot at the points or sew from one curve to the next. You’ll see as you go from curve to curve that each cathedral window frame will either fold over the one your about to sew or can be tucked under. Go with the flow!

Alternate Quilting Method:

If machine quilting is not your cup of tea this pattern is great for using an applique stitch along the cathedral window frame and makes for a nice couch project. You can use the applique technique on just the top for less bulk.

9) Trim your extra batting and backing and bind your quilt!

Thank you to Betz and Riley Blake Designs for letting me play with this colorful line!

Happy Sewing!

Dutch Cathedrals Pattern 18

Hand to Heart

My grandma Brewer, on my mother’s side, has always been a sewing gal, but over the years and decades her rheumatoid has taken a harsh toll on her hobbies and sadly, many things have had to be handed down to the next generation.  I use the word “sad” because it’s a signal to me that her heart is ready to start letting go of things, ensuring they end up in the right home with the right person.

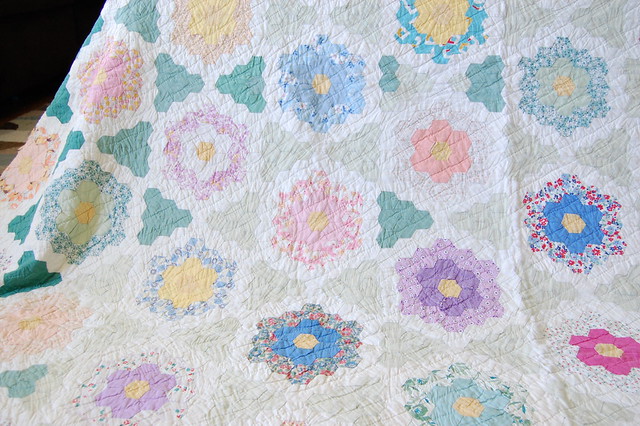
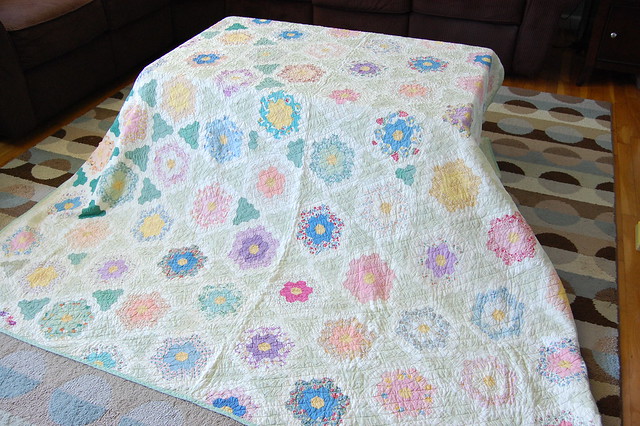
Great Grandma Dills Quilt

There were a few quilts that I had never seen before hiding in the basement laundry room.  Safely tucked away in plastic zipper bags and sealed away from dust and bugs, I was able to pick my own hand sewn quilt from my Great Grandma Dills (Grandma Brewer’s mother).

This quilt is such a time capsule of an era and is simply amazing.  We judged the fabrics to be from the late 30s-40’s (this quilt is almost 80 years old already and will turn 100 in my lifetime). Most likely sewn while the kids were in school.  I can’t say for sure if a pattern was followed but I’m almost certain those hexies were paper pieced even though I couldn’t find a trace of old newspaper anywhere.

And it’s soft.

Great Grandma Dills Quilt

Wrinkled with use. Great Grandma Dills Quilt

Falling apart slightly and all hand sewn.

Great Grandma Dills Quilt

Beautiful. I didn’t know my Great Grandma that well. She suffered from dementia and it was hard for us to visit and be present for her at such young ages, but having this quilt is a quiet reminder that we are all young once. Great Grandma Dills Quilt

Great Grandma Dills Quilt

We all have dreams.
We all have creativity.
We all have skills.

And even if age slowly steals them away the things we make will keep.

The Birchen Quilt

It’s incredibly windy and mild today, we’re talking 40 mph windy inside our neighborhood. Even though it’s a nice 64 degrees out it is much too rough to play out in the sun for long without getting chapped cheeks.

I’ve been working on my Birchen Quilt in the mean time and getting the last colorway of the half square triangles sewn together.


Getting there. #birchenquilt #fqsfun

I gathered the fabric for this last month and should be able to complete the top by mid-March if I can keep a steady sewing rhythm.  I’ve found that I can be very productive in 20-30 minute increments than if I’m sewing for hours on end.  Even though I love sewing and piecing all these tops together it does start to addle my brain after so long, especially when squaring up over 300+ half squares and sewing them together.

Slow and steady!


Something To DO

I have been plowing through projects left and right this month.  I’m really quite impressed with myself for being able to get to a completion point for my Yellow Brick Road quilt and also my first of twelve Mini Barn Cat Quilts.

January's Mini Barn Cat Quilt is almost done.  #fqsfun #farmgirlvintage

While I do feel like I have a lot on my plate, creatively speaking, it’s been a rather gratifying start to a new year.  Creativity sparks creativity.

Now if I could just finish my Pink Birdie cross stitch pattern…..

Unfinished

I’ve been taking a break after a few crazy weeks of project deadlines and general chaos to just mellow out.  Spring is in full swing around these parts which means I’m outside more than I’m in.

But I took a little time away from getting seeds planted and flowers arranged to pull out a few of my languishing works in progress.  I was not pleased to see that blue pinwheel quilt from the Field Greens pattern by Madison Cottage Design, still not even backed….though I know I have the backing and binding for it (labeled) in a bin somewhere.  Looking at the back of that one made me realize that I should go back and press open as many seams as possible to showcase those amazing pinwheel points.  It also reminded me that I finished the top about 2 years ago.  I made this for myself, such a rare thing, and still have yet to enjoy it fully.

Then there’s the Patchwork Bears Baby Quilt from Present Perfect that I helped pattern test for Betz over a year ago.  That also has the backing and binding hiding in one of my bins.  I had to kick myself for not finishing this one when I had the time over the winter.  I even know how I want to quilt it.

And my most recent addition to the “unfinished” pile is my Science Fair quilt from Jaybird Quilts.  Though that one hasn’t been sitting around for very long it’s still been hanging around for too long already.  At least that one is batted, backed and basted.  I love you Hexie quilt, but I just need some “alone time” right now.  I’m not ready to commit my shoulders to quilting you just yet.

Eventually I’ll get my garden in and my flowers finished to the point that they become an enjoyable maintenance for the season. Till then I’ll have to keep these guys neatly tucked away and then suck it up and quilt on.